Roasted Red Pepper and Butter Bean Hummus

wpid-img_20150314_101709.jpg

I have often acknowledged my love for roasted Red peppers. I love the smell and the taste of it and often make it at home when I have some spare ones and am using the oven for cooking something else. It’s great as a pepperonata Dip or Sauce (recipe here) and its also a great addition to Hummus. Hummus are very easy to make and are very healthy too. Do not be afraid to experiment with different flavours and trust me the end product will be way better than the supermarket versions that we buy. The following recipe uses Butter beans instead of the traditional chickpeas. The Butter beans produces a creamier end product and so we do not use much oil and do not add any Tahini (sesame seed paste) and thus making it even healthier. Reserve some of the juices that ends up on the roasting pan. Roast the peppers and leave them covered to cool and this helps to peel the skin off easily. make sure that the peppers have cooled down completely before using them. I often roast them after cooking some dinner in the oven and then leave them on the kitchen top covered to cool overnight. This way I also can get fresh Hummus prepared in no time in the morning.

Ingredients
Butter beans – 1 can of about 400 gm
Roasted red pepper – 1 large or 2 small
Roasted garlic clove – 2 medium
Cumin Powder – 2 tsp
Lemon juice – 2 tbsp
Crushed Chilli – 2 tsp (optional)
Extra Virgin Olive oil 4 tbsp
Salt – to taste

wpid-20150314_091211.jpg

Method
Drain the beans and take the skin off (optional) if you like a creamer end product. I take about a half off and leave the other half. Then put all the ingredients except oil in a food processor and process for a minute. If you want to have a less thick end product add some of the juices from the roasting tray. Now with the motor running add the oil slowly.  Mix well. Season and serve with nice toasted bread, or vegetable sticks or pitta bread crisps or whatever takes your fancy.
wpid-20150314_131131_20150314143309144.jpg

Advertisement

Pasta with Tuna in a Spicy Tomato Sauce

20141103_211604For a quick midweek dinner using store cupboard items this dish is fairly easy to put together and very satisfying too. I have used Tinned Plum Tomato but you could use tinned Chopped Tomato too. I have also added capers to this dish as I had some lying in my fridge but if you don’t have it then do not worry. I have used Spaghetti here but you could make it with with whatever pasta you have lying around. I would have loved to have been able to finish this dish with a good sprinkling of Parsley but on this occasion I had none left. So if you do have some add  them just before serving. You could also add chopped olives if you prefer and have some lying around. (ps. the sprinkling that you see in this picture is a shop bought Chilli Garlic Mix that also includes fennel. Its quite nice and I add this to a lot of my food).

Ingredients (the sauce should make for 4 to 5 portions)
Spaghetti – about 75 to 100 gms per portion
Tinned Plum Tomato – one tin
Tin of Tuna – 2 of 185 gms tins (use no drain or spring water ones if possible)
Garlic Cloves – 4 medium Chopped
Shallots – 2 small (or a small onion) very finely chopped
Dried Red Chilli – one medium chopped
Capers – around 15
Salt and Pepper
Olive Oil
Handful of Chopped Parsley
Juice of a quarter lemon

Method
Heat oil in a Heavy Bottom Pan. Add the Chopped Garlic and Chilli. Fry for about 30 seconds and add the Chopped Shallots or onions. Fry for a couple of minutes on medium flame. Then add the Capers and the Tomatoes. Add a little salt and stir with the flame turned medium to high. When it starts to bubble reduce the heat and simmer gently with a lid on for about 20 mins stirring from time to time. Now prepare the Pasta as per packet instructions which should take around 10 minutes of boiling. When Pasta is almost done add the drained tuna to the sauce and stir. Check for seasoning and take it off the the heat. Squeeze in the Lemon Juice. Drain the pasta well and mix it with the sauce. Divide into bowls and Sprinkle with the chopped Parsley and serve with a Salad or some Garlic Bread

Thai Green Vegetable Soup

image

After a few weeks of eating to our hearts content during our trip to India, it was time for some simplicity and some home comforts. The morning after we arrived back a supermarket shopping trip was the first thing on the list. Out sleeping pattern seemed to cope with the timing better than out tummy. (India being five and a half hours ahead). We fell asleep early around 9 pm and woke up around 6.15 am feeling fairly refreshed but very hungry. Soon after the school run A bowl of Porridge followed by a yoghurt and then a few pieces of chocolate were consumed before we headed to the supermarket. During shopping we felt another hunger attack. At that point we decided to get back home and make a quick soup. My wife spotted a 450 gms mixed diced casserole veg pack with kale and pearl barley. So we came home and she started to prepare a quick tasty soup. I added the Thai Green twist but kept it simple. I have tried to break it down as best as possible to get a recipe. You can use any vegetable mixture as per your choice either from fresh or a pre packed one. Our 450 gms pack (including the Pearl Barley) produced 3 generous portions. You could choose to use coconut milk or replace it with skimmed milk to make it a bit healthy. I used about 1tbsp of creamed coconut and about 150 ml milk.

Ingredients
Carrots – 100gms
Swede – 100 gms
Celerlac – 100gms
Onion – 50 gms
Pearl Barley – 50 gms
Kale – 50 gms
Salt and Pepper to taste
Thai Green Curry Paste – 1 heaped tbsp
Coconut Milk – about 150ml

imageMethod
Heat a wide bottomed pan. Add Boiling water to it and add all the vegetables. Add a heaped tablespoon of the green curry paste. Bring to a boil and simmer for about 15 minutes. Make sure that the vegetables are tenter. If not then boil for a bit longer. Add the coconut milk (or cream or normal milk) and simmer for a further 10 minutes. How blend (not too smooth) using hand blender. Season with Salt and Pepper. Add a tiny squeeze of lemon juice (optional) and serve with crusty bread or on its own. It was a quick and tasty soup that was ready in no time.


Tomato Soup

image

Tomorrow we leave for a two and a half week holiday to India. We spent the day yesterday and today trying to finish up all the fruits, vegetables and other perishables at home. This morning I discovered a few fresh tomatoes and immediately thought of making a simple soup. Winter is a time when we all enjoy a hot bowl of soup. In our home the hand blender is one of the most used kitchen gadget. We often make a soup with whatever vegetables we have at home and also we make a lentil soup using red lentils (recipe to follow later). These all are fairly easy and quick to make. Tomato soup is nutritious and a great way to get some veg into your little ones too. I usually add carrots and celery to mine. If you have any fresh fennel lying around then add a bit of that too. Try and use the best quality tomato you can get hold of as that’s the key ingredient here. I have used canned chopped tomato in the past and they give good results too. Just use a whole 440 gm or thereabout can of good quality chopped tomato. I often add a bit of cream or a spoon of cream cheese or crème fraîche at the end. You can also use fresh or powdered stock for a deeper flavour but if its good quality tomato then I prefer to let the tomato do the talking.

Ingredients
Tomatoes 4 medium sized chopped
Carrot one small cut into dices
Celery one medium stick cut into slices
Onion one small sliced ( I used shallots here)
Garlic 3 cloves chopped
Bayleaf one
Thyme a fresh sprig or a tsp dried
Salt and pepper to taste
Olive oil about 2 tbsp
Double Cream 4 tbsp or 2 tbsp cream cheese (optional)

image

Method
Heat a heavy bottom saucepan over medium heat. Add olive oil. Add the garlic and after a quick stir add the onion. Fry for a few minutes and add the carrots and celery. Fry covered on a low heat stirring often for about 10 minutes. Add the tomato and salt and put the heat up to medium and stir till the juices from the tomato starts to come out and the mixture starts to turn into a pulp (around 10 mins). Now add about 300 ml hot water and bring to a boil. Add the Bayleaf and thyme. Lower the heat and simmer for abound 15 minutes. Take off the heat and blend using a hand blender. Add cream or cream cheese if using. Dilute if necessary. Bring to a gentle simmer. Season the soup and serve immediately with some crusty bread. ENJOY!!
image

follow me on twitter @kaushikpauluk

Creamy Chicken Kebab (Chicken Malai Kabab)

Its incredibly easy to prepare Kebabs at home yet it seems that many people shy away from preparing them as perhaps they are not so sure about the marination or maybe they think that its a lot of hard work. They get cooked in BBQ’s (either shop bought or home marinated) but not considered much for general home cooking. Chicken Kebabs are very easy to prepare, are very healthy and are quick to cook. A bit of advance planning with the marination will ensure that you can have your dinner ready in less than 30 to 40 minutes, ideal for cooking when slightly short on time. Get the Meat marinated ahead and leave in the fridge overnight or for as less as 3 hours. If cooking after coming back from office or so try and leave it outside for a bit while you freshen up or get changed. The grilling itself takes about 10 to 20 minutes. Its best served with some light salad, pilau rice (Can be shop bought microwave version) or even a ready made tortila wrap. In India it gets served with Paratha Bread or Naan, usually a mint Chutney and some salad with onions.

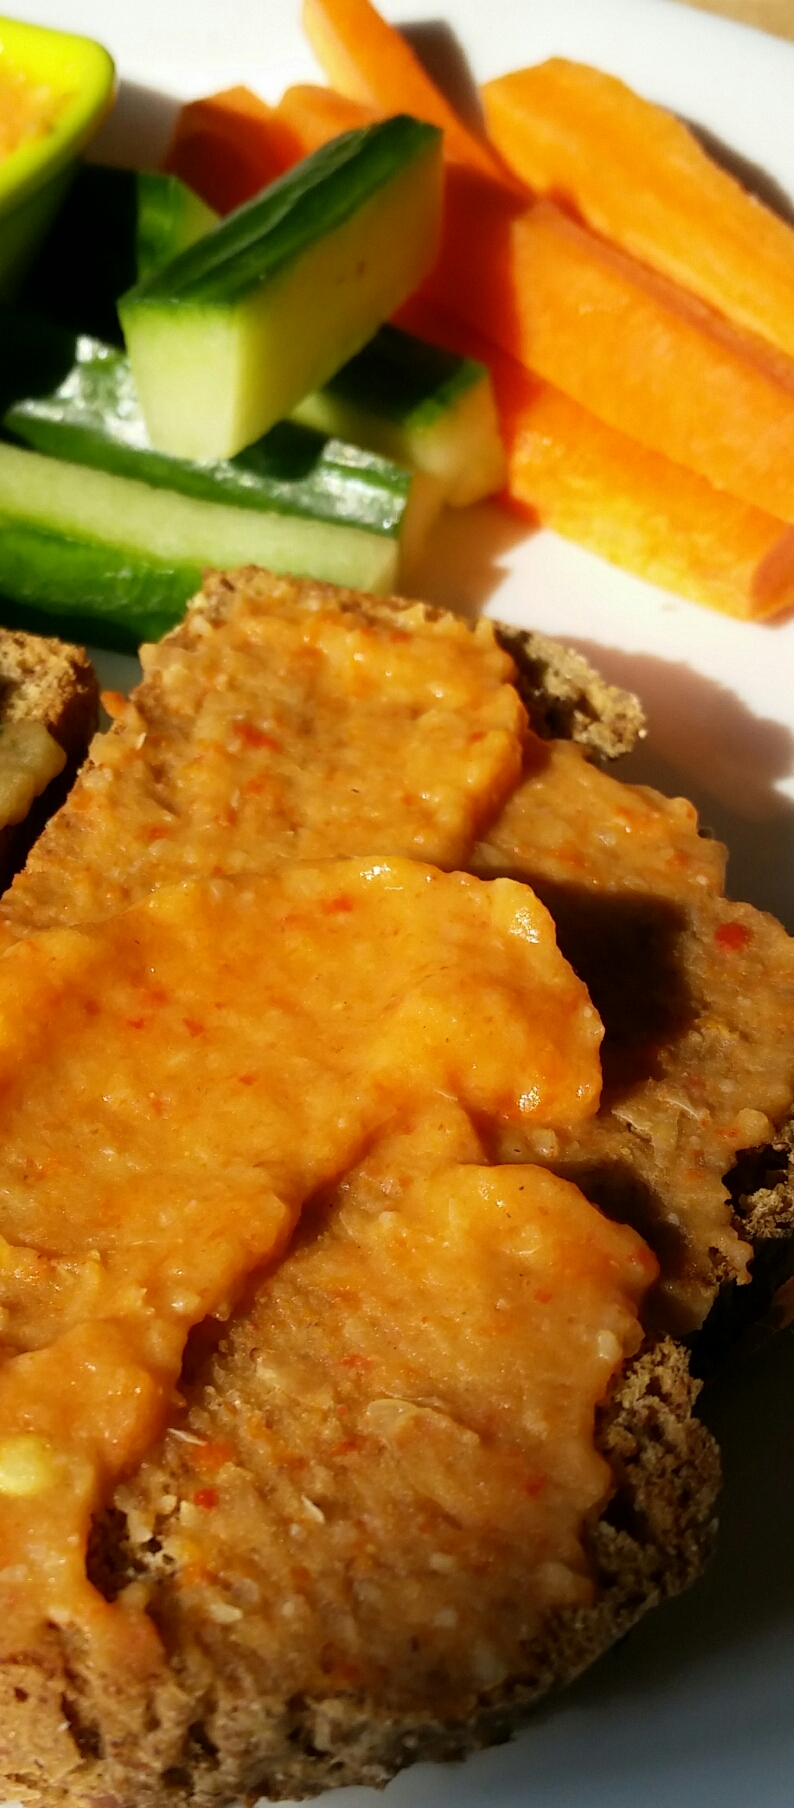
Today’s recipe is for Chicken Malai Kebab (Creamy Chicken Kebab). Its my modern take on a Indian Classic. The end product is deliciously moist and the mild creamy nature is a big hit with the young fussy eaters too (if preparing for them perhaps omit or reduce the chilli, I use a separate marination without the chilli). I find that about 3 hours is enough for the marination but anything upwards of an hour should suffice. You could decide how healthy you want to make this dish (you could use light cream cheese or substitute half of it with sour cream or Greek yoghurt. But ). Some recipes call for two stage marination ie one first on with salt, pepper, ginger and garlic and after about 30 mins a second one wit the rest of the ingredients. I leave it up on you to decide how you want to do it depending on the time that you might have on your hand. While cooking keep an eye on it and try and not dry out the surface too much. Cut and check one inside to see if it has cooked. I use a George Foreman Gill and so it looks quicker and gives a lovely char grilled marks on the meat. In the following picture I have had to use red chilli as I did not have any green chilli at home at that time but green is much better in this recipe. (I have a shop bought Chilli Garlic Grinder that also includes fennel and I have used some of that in the marination but that is not necessary)
20150127_164300

Ingredients :

  • Chicken Breast 500 gms cut in medium chunks
  • Ground White Pepper half tsp (or black if you do not have white pepper)
  • Salt to taste
  • Cardamom Powder half tsp (use freshly ground if possible using the seeds inside a pod or if you do not have it use allspice instead, see below)
  • Ginger paste 2 tbsp
  • Garlic paste 1 tbsp
  • Green Chilli 2 nos or to taste
  • Corriander Leaves a handful
  • Cumin Powder half tsp (if you do not have this you can use a readymade curry powder)
  • Garam Masala (use allspice as a substitute but do not add Cardamom powder) half tsp
  • Cream Cheese (eg Philladelphia) about 4 heaped tbsp
Method :
Pat Dry the Chicken pieces and apply half the salt and the white pepper. Rub and leave it aside while you are preparing the rest. Make a paste of the ginger and garlic (if making your own) with the chilli, coriander leaves, rest of the salt, cream cheese cumin powder and the garam masala. Rub the chicken well with this mixture coating all the pieces well. Cover with a cling film and leave in the fridge. Soak the wooden skewers if you are using any.
Heat the Grill and skewer the marinated chicken using the soaked skewers without overcrowding them. (You could put them directly onto the George Foreman grill and cook without the skewers.) . Place on or under the grill and cook the chicken rotating regularly as necessary. Keep an eye on this as they cook very fast. the cream cheese will cause some lovely colouration on the Kebabs and take a piece out and cut in half to check whether its cooked through or not. If you overcook this it will dry up quickly (the outside should retain some moisture. You could also brush the Kebab couple of time while cooking using melted butter for a really yummy moist result (I did not follow this step on this occasion). Once you have checked if they are cooked take them off the grill and serve immediately. ENJOY